

It seems that every year, soon after school starts, so do the sniffles! I have had sooo many kids sneeze, cough, and drip in my room this past week! Between home and school, I go through more tissues in a year than I could possibly count! Fortunately, tissue boxes are FANTASTIC for DIY therapy activities!

These are my favorite tissues to buy, mostly because the boxes are so versatile! Here are just a few things I have made with this type of box:
Dice! There are so many different things you can do with dice. For example:


*Hint: When I make dice, I cut a small piece of cardboard from a cereal box (or other similar box) to cover the hole. The, I wrap the tissue boxes like I'm wrapping a gift (I let the white side show, but you could leave it colorful). Then I add the images/words I want to the sides and cover the whole thing with mailing tape. I found that easier to work with than contact paper.
Grab box: Leave the box as is, or you can use a square of felt with an X cut out of it to cover the hole in the tissue box. Then you can use the box for any random drawing activity. This is a great way to make any of your language and artic cards more interesting - place the cards in the box and kids draw one out when it's their turn.
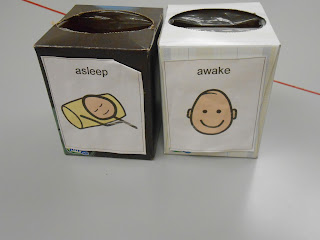
Sorting boxes: Place icons depicting your criteria on the sides of the boxes and have kids sort appropriately. I used this activity with my preschoolers when we read "The Napping House." We talked about the characters in the story and when they were awake/asleep. Then we used the cards to work on subjective pronouns ("He is awake," "She is asleep"). Finally, we sorted the cards into the appropriate boxes.
Animal Eaters: I have a few different boxes with open-mouthed animals. The monkey is from the Kids Express Train music program for SLPs. It's for the song titled "Let's Eat." We use it to reinforce the concepts in the song (e.g., "The monkey is eating the pizza") as well as present tense/negatives ("The monkey likes bananas" "The monkey does NOT like toast."). The dog is a simple reinforcer activity from "More Clinician's Choice: Favorite Activities for Speech and Language" published by Communication Skill Builders.
Dice! There are so many different things you can do with dice. For example:
- Emotion Dice: Roll the dice and describe a situation that may make you feel the emotion you see. For very young kids, roll the dice and make a face in the mirror like the one on the dice.

- Graphing Dice: I made this one to go along with a thematic unit on pets. Each child in the group got to roll the dice and add a tally mark to the pet graph. We then talked about the concepts of more/less and all/none. You can grab a copy of the graph and dice images here.

- Question Dice: I use this one to make answering questions about a story a little more interesting. Kids roll the dice and I give them a question based on the WH- word they roll (e.g., "Who" --> "Who was the main character of the story?"). Here's a copy of the doc I made for the words.

- Category Dice: Write different categories on each side of the dice. Have students roll the dice and name as many members as they can.
- Attribute Dice: Label each side with the following attributes - Color, Size, Shape, Function, Category, and Association. Pull out an object (e.g., apple). Have students roll the dice and tell you something about the object based on what they rolled (e.g., Color - red, green, or yellow; Size - small; Shape - round; Function - you can eat it; Category - fruit; Association - like a pear).
*Hint: When I make dice, I cut a small piece of cardboard from a cereal box (or other similar box) to cover the hole. The, I wrap the tissue boxes like I'm wrapping a gift (I let the white side show, but you could leave it colorful). Then I add the images/words I want to the sides and cover the whole thing with mailing tape. I found that easier to work with than contact paper.
Grab box: Leave the box as is, or you can use a square of felt with an X cut out of it to cover the hole in the tissue box. Then you can use the box for any random drawing activity. This is a great way to make any of your language and artic cards more interesting - place the cards in the box and kids draw one out when it's their turn.
Sorting boxes: Place icons depicting your criteria on the sides of the boxes and have kids sort appropriately. I used this activity with my preschoolers when we read "The Napping House." We talked about the characters in the story and when they were awake/asleep. Then we used the cards to work on subjective pronouns ("He is awake," "She is asleep"). Finally, we sorted the cards into the appropriate boxes.

Animal Eaters: I have a few different boxes with open-mouthed animals. The monkey is from the Kids Express Train music program for SLPs. It's for the song titled "Let's Eat." We use it to reinforce the concepts in the song (e.g., "The monkey is eating the pizza") as well as present tense/negatives ("The monkey likes bananas" "The monkey does NOT like toast."). The dog is a simple reinforcer activity from "More Clinician's Choice: Favorite Activities for Speech and Language" published by Communication Skill Builders.

 |
| Here's my son feeding the dog :) |
If you're still not convinced that saving your tissue boxes is a great idea, here are some tissue box Pinterest finds:
How about this super simple crayon box idea from Money Saving Mom:

How about this super simple crayon box idea from Money Saving Mom:

And I love these ideas from Crafty Kids with Carey Poppins:


I liked this one so much, it inspired me to create my own frog version:

It's painted with about 6 coats of green paint. The eyes are egg carton cups, also painted with about 6 coats of green paint and topped with googly eyes. The tongue is a ribbon, and I drew in the legs. I thought this might be a cute variation to use with the Articulation Bugs that were posted by Brea at Let's Talk Speech-Language Pathology.
The Big Boxes!

If you're on Pinterest, chances are you've seen these tissue box monsters from A Day With Lil Mama Stuart. They're made from tissue boxes and egg cartons. I've seen people pin these with the idea of using them as "Tattle Monsters" where children suppress the urge to tattle by writing their complaints and feeding them to the monsters. I've also seen comments about using them to "eat" articulation cards for phrase and sentence level practice (e.g., "He is eating a lemon").

Here's an adorable reindeer made from a tissue box and popcorn box (as seen on Playing with Words 365). You can use him to go along with Katie's printable book "The Very Hungry Reindeer."

Also the tissue box guitar/ukulele project seen on The Crafty Crow.

How about these ideas from Simply Crafty (if you follow this link, there are many more ideas!).
 |
| Monster Feet |
 |
| Mater |
 |
| Rocket Ship |
Do you use tissue boxes for DIY therapy activities? If so, what are you using them for?
