Pages

Tuesday, October 30, 2012

To Be (Free) or Not to Be (Free)

"Why do some SLPs provide materials for free and others charge?"


"How do you decide what materials you are going to charge for?"


"How do you decide how much to charge for your materials?"


"Why do some blogs have advertising and some do not?"


"Do you plan on reducing the number of freebies and start charging for all of your materials?"


These are some of the questions I've been asked lately.  I figured if many people were asking, probably more were wondering.  So, here goes:


I discovered the world of SLP blogs in January of this year, shortly after I discovered Pinterest.  I thought it was wonderful that so many creative SLPs were putting their ideas out there and sharing with the rest of us.  I loved the idea of an online community as well and I wanted in! (Check out this post from CC at If Only I Had Super Powers on  social/pragmatic skills for the blogging community).  In June, I had some extra time on my hands (Hello, Summer!) and figured that was the perfect time to start!  


Let me tell you, when I started, I had so much to learn (still do!)!  For instance, did you know that Mayer Johnson does not allow SLPs to create materials using Boardmaker PCS icons and share them free of charge in files not original to Boardmaker?  This means that they do NOT want you to create a PDF and share files made with their software to people who do not have Boardmaker.  Mayer Johnson prefers you to share activities created with Boardmaker on the Boardmaker Share site.  My first activity that I uploaded was created using Boardmaker PCS.  When I learned this, I had to scramble to get it down, remove the PCS, and add other graphics.  Interestingly, Mayer Johnson DOES allow you to sell materials that are made with less than 50 PCS!


by Scrappin Doodles
You see, people/companies that create graphics (e.g., Mayer Johnson, Scrappin Doodles, MelonHeadz) have "TERMS OF USE."  Some allow you to create educational materials with their graphics and give them out as freebies on a blog.  Others allow you to sell materials on TPT.  Others allow for either type of distribution.  Some graphics are free, but most are paid.  I try to grab free graphics when I can, but I typically pay $2.00-$7.00 for the graphics I use.  Also, some companies require you to purchase a license (in addition to the graphics) to distribute materials created with their graphics.


Now, I never got into this blogging venture to MAKE money, but I certainly did not get in it to LOSE money!  So, I added advertising to my page.  Well, most people don't click advertising links, so that was not paying for the graphics/licenses.  I then became an Amazon affiliate and added links to Amazon for my "Book of the Week."


That still doesn't cover the cost of graphics, so I decided to add a few paid items to my TPT store.  That's been more helpful! (Thank you to those of you who have purchased items!!!).  How do I decide which items to sell?  Typically those that are larger files and have taken a lot of time to create are the ones that I put up for a fee.  I like to keep costs low, so I don't charge more than a few dollars.  I do not have the "paid" seller account at TPT, so I actually get a little less than half of the total price of the item!


I think that covers all but the last question.  The answer to that one is "yes and no" - While I DO plan to add more paid items to my TPT store, I DO NOT plan to charge for all or most of the materials I post.

The bottom line is that blogging is a labor of love.  It takes a lot of time, effort, and sometimes money to create new materials to share (whether freebies or paid).  Offering materials free of charge or for a fee is a personal decision for all bloggers.  If bloggers decide to charge for an item, consider purchasing it if it meets your needs!  When a blogger offers a free of charge item, support that decision by posting a "thank you" comment.  Comments on blogs and Facebook pages are always welcome and appreciated and motivate us to keep doing what we're doing!

Hope that answers some of your questions and helps you understand (at least from my perspective) why some materials are free and others are not!


Sunday, October 28, 2012

Articulation Turkeys

I was going to wait until tomorrow to post this, but with a hurricane on its way, I'm not going to take power and internet access for granted! 


So I saw this cute clip art on TPT by Stacy Johnson (http://doodledotillustrations.blogspot.com) and decided to put together an activity focusing on articulation.  After I started working on this download, I saw this post and activity targeting on categories from Jenna over at Speech Room News.  I guess great minds think alike!


So here are my Articulation Turkeys...


I created turkeys for the sounds I am currently targeting in my articulation groups - /k/, /l/, and /f/.  I also threw in /s/ and /g/.  They are feather-less turkeys with a target phoneme printed on the belly:


Then there are 6 feathers for each target sound (initial position).


I also added one blank turkey and a page of blank feathers so you can add your own images to target other sounds.  You may want to leave the turkeys blank and use the turkeys and feathers as a simple reinforcement game.

My kids often like to do cutting/gluing activities like those found in the Scissors, Glue series from Super Duper.  Because of this, I added black and white turkeys/feathers so that you can create your own cut & paste worksheets.

You can grab this 15-page document FREE from my TPT store.  Hope you enjoy!


UPDATE 10/30/12:   Brea over at Let's Talk Speech-Language Pathology created a similar activity with MORE phonemes and MORE word positions.  Head on over and check it out!

Thursday, October 25, 2012

Thanksgiving FREEBIE!

Today was supposed to be my professional development day, but I'm home with a sick little guy.  While he's been lounging on the couch and watching movies, I've been working on this Thanksgiving Bingo game for you!

There are six different bingo game boards:


Plus a vocabulary list with draw cards:


Download this Freebie from my TPT store.  Hope you enjoy!


Activity updated 7/20/13.  Actual product may differ slightly from images above.

Wednesday, October 24, 2012

Spreading Some Bloggy Love!


Wow!  I just have to say that last week was busy and eventful in many ways.  Because of that, I haven't had a huge amount of time to plan and create materials.  So, this week I'm planning on using some of the AWESOME ideas I've seen on other speech blogs...

With my articulation groups, we're adapting this activity from Crazy Speech World:


Jenn had her students describe a target word (written on the tree) and add those words to leaves that were then glued to the trees.  I'm having my students glue pictures of target articulation words to the leaves...

final /k/ tree
I have a couple of language kiddos mixed into articulation groups, so they are making fall vocabulary trees using fall vocabulary pictures I found on Pinterest.  I tried to get you the link, but it now says the page does not exist :-(

Fall Vocabulary Tree


I also have a group of articulation students who are working less on specific sounds and more on sound sequencing within multisyllabic words.  For those students I'm  using Grammar Gum Balls by Jenna over at Speech Room News:


In my higher functioning (older) language groups, I'm planning on using Trick of Treat Pronouns created by Brea over at Let's Talk Speech-Language Pathology.


from Let's Talk Speech-Language Pathology

For my younger language groups, I bought Halloween Bugs: A Trick or Treat Pop Up Book, that was recently highlighted by Chit Chat and Small Talk.


Pam included an adorable craft to accompany this book - a DIY lift the flap book using paper bags!

from Chit Chat and Small Talk

I went to drag out my paper bags to make this book, but couldn't find any.  I realized that I had actually donated them to my son's classroom because "What do I need paper bags for?"  I ended up using card stock for my version:

8-1/4 x 5-1/2 inch rectangle, folded to make a 5-1/2 inch square


PS, My son loved the book!

I think I see knock-knock articulation books in my future!


Thank you, thank you, to all of you wonderful bloggers for posting these GREAT ideas!!!  Have you tried any of these ideas in your speech rooms?

Monday, October 22, 2012

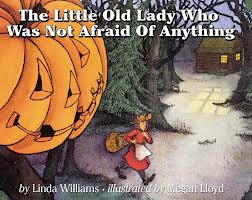
Book of the Week: The Little Old Lady Who Was Not Afraid of Anything


I have seen a few other posts about this book lately, (check out these posts by Playing With Words 365 and Chapel Hill Snippets to start) so I wasn't going to write about this one, but it really is the book I'm using this week!  "The Little Old Lady Who Was Not Afraid of Anything" by Linda D. Williams is one of my favorite Halloween stories.  I love the repetition and predictability of this book and the kids always get a kick out of the surprise ending!  I read this one every year and typically do the same activities I'm going to tell you about.  Reading the other posts, I was surprised how similar we all are in how we incorporate this book into therapy!

If you're not familiar with the story, it's about a little old lady who ventures out into the woods to gather some herbs, nuts, and seeds.  She's gone so long it starts to get dark.  On her way home she meets two shoes that go "Clomp! Clomp!," one pair of pants that go "Wiggle! Wiggle!," one shirt that goes "Shake! Shake!," two gloves that go "Clap! Clap!," one hat that goes "Nod! Nod!," and one scary pumpkin head that goes "Boo! Boo!"  Even though she's not afraid of anything, she runs home and locks the door behind her.  She hears a knock and the pumpkin head tells her that they came to scare her.  She tells them that they cannot scare her...they get together to make a scarecrow.

My take on it:
Again, I know these ideas may not be new and/or innovative.  But, here goes:

I use this book as an in-class lesson.  I start out by telling the students the title of the story.  I ask each student if they have anything that they're afraid of.  Usually the answer to that is "no," until they hear another child say something that scares them.  I then draw their attention to the "L" in "Little" and "Lady."  We talk about the letter and it's sound and brainstorm other words that start with "L" (artic practice for my kiddos working on /l/).

BTW, I tell the kids I'm afraid of snakes and spiders (Hello, /s/ blends!)...


I read the story with story props that I printed from Toddler Approved.  I colored and laminated the props, then attached velcro so I can put them together to form the scarecrow at the end of the story.

I lay the props out on the floor in front of me as they appear in the story.  I have the children repeat each sound with an accompanying movement (e.g., stomping their feet for the "Clomp! Clomp!").  As we're reading the story, I touch each prop as we do the sound/movement.  When we get to the end where the little old lady goes to sleep, I ask the kids to close their eyes and pretend to sleep.  While they're doing this, I put the scarecrow together using the props and hide it behind my back.  When they're "awake," the props are gone and the students no longer have the visuals to sequence the order of the items for the last go-through of all the items.  I usually start them out with "She saw two shoes that go..." then see how much they can remember of the order and accompanying sound/movement.  On the last page, I bring out the completed scarecrow!

Toddler Approved shows the items taped to a wall

After we read the story, we use puppets that I made by printing the felt board pieces from Making Learning Fun onto card stock, laminating, and attaching to popsicle sticks.  I made a couple of sets of these because some classes have more than 6 kids.  I hand out one part to each child.  I pay attention to the child's speech and language goals when I've giving out the puppets.  For example, if I have a child working on /sh/, I give that child the shirt puppet.  I play the Old Lady.  We then act out the story and I ask "WH" questions along the way.  I start out saying something like "One day, I went for a long walk in the woods.  Now, I know I came out here for a reason...Hmm, why am I out in the woods? (to pick nuts and seeds) Oh, right!"  As I "meet" the clothing items along the way, the children follow me around the room until we have a little parade going.  They love this part!

felt board pieces from Making Learning Fun


When we're done with our "play," we review the items and their noises and review any articulation target words.

I have used this book in small group settings with older students as well.  After the story, we typically play the Clothes Match Fun Game from Making Learning Fun.

Clothes Match Fun Game


What's your take on "The Little Old Lady Who Was Not Afraid of Anything"?


Friday, October 19, 2012

Artic Cards

Thank goodness it's Friday...and Thank Goodness for Super Duper's Jumbo Artic Drill Book!!!


Somewhere in my move from one school to another, I lost my /k/ cards!!! Oh the horror!  I have a group of students working on /k/, so we've been using the cards from Artic Chipper Chat until I could find my lost cards.  Well, we're now more than half-way through October and I still can't find them. :(  So, I started making a new set.

Many SLP Bloggers have written about what they use/how they make their articulation cards, so here's my method.  I've been using the Jumbo Artic Drill Book for years to make cards.  I would photocopy the page I wanted (2 copies), color the pictures, paste them on a half index card, then laminate.  I always make 2 of each artic card so we can use them to play memory or go fish.  I'm guessing I'm not alone in that!  Here are some of my /l/ cards:


Fast forward a few years and I'm still using the Jumbo Artic Drill Book to make cards.  The only difference now is that I've acquired the Drill Book Add-on with CD ROM!


Now I can print in color and save myself the step of coloring in all the pictures!!!! (Time saver & life saver! Especially when you lose one of your most frequently used card sets!)


My new /k/ cards in progress:


And completed:


Do you purchase or make artic cards?  If you make them, what's your method?

Thursday, October 18, 2012

Go Away Big Green Monster!


For my pull-out language lesson this week, we've been doing "Go Away, Big Green Monster!" by Ed Emberley.  I have the book and the kids love it, but this year I decided to use the app version.  Initially, I was somewhat skeptical about purchasing the app.  Based only on the screenshots in the App store, I assumed it to be essentially the book (without any frills), just presented on the iPad.  It does tell the same story as the book, but there are a few options - you can read it yourself, have it read to you by Ed Emberley himself, have it read to you by a child narrator, or listen to a song version.  Also, at the end, instead of a blank black page with just words, there's a moving light (as if from a flashlight) that highlights the monster and his little monster cat.  The kids LOVED this part!


Here's what we did...First I selected the "Read to Me" option and I read the story to the students just as I would read the book.  With the app version, however, you can touch the parts of the monster and they move with a corresponding silly noise (the favorite so far has been the "sharp white teeth").  Once the monster was completed, I asked students to touch specified parts of the monster (receptive identification).  They were then asked to tell the parts to "Go away!"  Some of my students are at such a level that imitating the "Go away!" alone was sufficient speech practice.  With other students I added the body part (e.g., "Go away eyes!").  The more advanced students were required to use the full descriptor (e.g., "Go away big red mouth!").


After going through the story once with me reading, we listened to the story again.  I gave students the option of listening to the song or to the child narrator.  Most picked the song and, I have to say, it's quite catchy!  I wasn't certain how the kids would respond to a song they weren't familiar with.  However, I was surprised that almost all of them attempted to sing along!

After the second go-around, I gave the students a box of crayons and this monster face template - I traced the opening from the book:

download the face template here


I turned the app back to the "Read to Me" option.  This time around, we drew our own monsters in the sequence that is presented in the story.  Some of the kids impressed me with their ability to anticipate the next item to come!  I did use the app as a visual for them, but they were given complex directions (e.g., "Get your yellow crayon and draw two big eyes").  Some required extra support and/or break-down of directions.  When finished they had to tell me about their monsters (e.g., "My monster has purple hair").  I also required some of the kids to use past tense verb forms (e.g., "I made two yellow eyes" or "I drew a long blue nose").  The monsters came out amazingly well! (Keep in mind that these were 3-5 year olds).


Completed monster face from the app


The directions they were given:
  • Get your yellow crayon and draw two big eyes.
  • Get the blue crayon and draw a long nose
  • Find the red crayon and draw a big mouth (I omitted the sharp white teeth since many of the kids couldn't figure out how to leave the teeth blank to keep them white....or they wanted white crayons, which, on red, produce pink teeth).
  • Get your blue crayon and draw two squiggly ears.
  • Find the purple crayon and give your monster some hair.
  • Find the green crayon and make his face green

Here are some of their monsters:


Side Note:  At the start of the school year, I saw a cute little iPad stand at one of the chain pharmacies.   I picked it up and was about to buy it and then saw the price tag - $9.99!  I couldn't believe it!  I have a case with a built-in stand, but somehow my kids are always managing to knock it over.  The angle it provides is not always fantastic for the kids to see either.  I ended up getting this adjustable plate stand from Michael's (almost identical to the stand I saw in the pharmacy) for less than $2!  It's perfect for holding the iPad and story books as well.  Great for freeing up your hands when you have story props!


plate stand
holding up the iPad


Let me know:  what are your favorite ideas to use with this book?