Showing posts with label therapy ideas. Show all posts

Friday, January 10, 2014

Mitten Mania!

Disclaimer: This post contains affiliate links to Amazon.com for your convenience.

BRRR!  It's been so cold all over the country this week that I bet even in the south kids are wearing winter clothing they've never seen before!  This week in my speech room, we've been doing activities related to MITTENS!  Here's the run-down:

The Mitten:
In many of my groups, we read "The Mitten" by Jan Brett. Who doesn't love this book?!? Believe it or not, I drew the animals from the story when I was in college (in the mid to late 90's) and they are STILL hanging in there!  This still shocks me because I didn't even think of laminating them at the time!  


Here's a closer look:


We worked on sequencing the order in which the animals went into the mitten and I found this printable emergent reader take-home book from Jamie Mayas on Teacher's Pay Teachers. What a great way for my preschoolers to practice the vocabulary from the book!

Noisy Story:
In some other groups, we read the Noisy Story "The Mitten." (Click HERE to see more information on the Noisy Stories program).  This story is about a lost mitten.  I begin the story by wearing one mitten and telling the kids that I'm going to tell them a story about something you can wear in the winter.  Believe it or not, they don't ALL clue in that the story will be about a mitten! Once they do figure it out, I tell them that there is a BIG problem in the story (mind you, I'm still wearing ONE mitten).  Eventually someone infers that there is a missing or lost mitten in the story...


At the end, the mitten is found on a snowman! My preschoolers love when I pull out my snowman (above) with the mitten stuck to his belly.  (Sometimes they make me feel like a magician!)  The younger kids worked on same/different using real mittens (see photo below) as well.

PS, If you want a similar type story for older kids, check out "The Missing Mitten Mystery" by Steven Kellogg.

EET: Mitten style!

I have rounded up a ton of mittens over the years.  I usually pick them up at the end of the winter in a clearance bin. We focused on the "eye" bead of the EET strand and described what the mittens look like.


I don't know if I mentioned this before or not, but I'm doing my Student Learning Goal for my Educator Evaluation on the EET.  Based on my mid-year data, my kids are just NOT getting the eye bead!  Here's an example of a very typical response from my kiddos during mid-year data collection:
Me:  What's this?
Student: A carrot.
Me:  Right! {shows green bead}Green-group. What group does a carrot belong in?
Student: Food group.
Me: Nice! {shows blue bead}Blue-do. What do you do with a carrot?
Student: You eat it!
Me:  You're doing great! {shows eye bead} Eye ball!  What does a carrot look like?
Student:  It looks like a carrot!
Me: {face-palm!}
We spent about 2 weeks on describing appearance, but I guess we need some more time with that!  So, we grabbed the EET strand and worked on describing the appearance of the mittens.  If you don't have a ton of mittens like I do, you can always make them out of paper.  


I used a pattern similar to the one below and printed them on letter size scrapbook paper, then cut them out.


Want a copy of the mitten patterns? Click HERE.

And there you have my week of Mitten Mania!  What are your favorite Mitten activities?


Tuesday, August 13, 2013

Dollar Tree Finds {Plus a Freebie}


I don't know about you, but the budget I'm given to buy therapy materials through my district is non-existent! (I'm somewhat OK with that though because anything I buy, I can take with me if I choose to switch schools.)  When you're buying your own materials, you really want to get the most for your money. Recently I made a visit to my local Dollar Tree (ok, three visits).  I found a few cool things that I'll be using in my therapy room this year and figured I'd share them with you!

Room Organization:

I have a shelving system in my room with containers for everything - scissors, crayons, markers, colored pencils, glue sticks are all in their own containers.  The only problem with this is when I'm trying to do an activity with a group and have to pull out five different containers for the supplies!  So, I got this cute little bin:


My plan is to keep it stocked with enough materials for a typical group to do a craftivity! I saw something on Pinterest where you add small (empty) vegetable cans to further subdivide the compartments and I may just do that as well!  I also got these cute stackable bins:


I don't have an actual desk (you can see pictures of my room here), so I don't have drawers.  I figured these would be a good place to store things like rubber bands, binder clips, pens, etc.

Student Reinforcers:

I love the party section of Dollar Tree for stocking up my prize box! I got toy frogs, lizards and dinosaurs, as well as those spinning-drum things, tops, pencils and erasers.


I found this cool thing as well!  It's a light-up wand with a spiky ball at the top!  I figured it would be a good sensory toy, but also double as a talking stick for my groups of blurters (I always end up with at least one of those!).


Therapy Activities/Materials:

Have you seen these Weird but True books from National Geographic Kids?  There is a free app in the series as well (facts are limited in the free version but you can do an in-app purchase for more). They're great for keeping older elementary students interested and you can use them for just about any language/articulation target!


Wind-up toys!  I had just passed up some cute wind-up toys as a local pharmacy that were $5.00 EACH!  I love wind-up toys for several reasons (they're good for getting kids to make requests and you can use them as a fun way to work on any "card" activity...see here for more on that)


Next, I found a trash can!  (Yes I meant to put it in therapy activities/materials, not in room organization!)  I saw this post on Schoolhouse Talk and decided I needed a trash can of my own!  You could also use a can like this for this activity from Crazy Speech World.


I was on the fence about grabbing these mini books, but after opening them, I'm glad I did!


Inside are fold-and-go books.  They are designed to target sight words, but I found that I can use them to target syntax, articulation, articles, auxiliary verbs, prepositions, etc.  Here are some examples:


I've been looking for sticky hands ever since I saw Jenna's post on Speech Room News.  I still haven't found them, but I did find these sticky lizards!  I figured the kids wouldn't mind lizards instead of hands!


I think this is my favorite find!  It's a dry erase poster called "Describing:  Bubble Map."  I just got the Expanding Expressions Tool and I thought I could modify this map for use with the EET!


Since many of us are getting ready for back to school, I created these circles with back-to-school themed vocabulary to put in the center of the map (there are 12 vocabulary words total) for describing purposes:


You can download these HERE.

I also grabbed some stickers and cute mechanical pencils for me, but didn't think those warranted a picture.  :)

What's been your best Dollar Store Find?


Monday, August 12, 2013

Don't Throw it Away! Zoo Maps

Summer is the perfect time for visiting the zoo!  When you pay for your admission, make sure you grab an extra map or two because they're great for use in therapy!

Here's a map I grabbed during a visit to Southwick's Zoo:

Front

Back

Ways to use maps in therapy:

Life Skills Groups:  

  • Have students figure out hours of operation, cost of admission, parking, etc.
  • Have students brainstorm what they might need to bring with them if they were spending a day at the zoo (e.g., money for lunch, sunscreen on a hot day, etc.)
  • Have students figure out how much money they should bring for the activities they want to do.
  • Have students call and find out if there are shows that day/what time the shows will be.
  • Ask questions regarding hypothetical events (e.g., What would you do if you were by the lions and you had to go to the bathroom?  What would you do if you fell down and started bleeding?)

Receptive Language:

  • Following Directions.  Have students put their finger on a location on the map.  Give directions (e.g., "If you go south until you see the monkeys then turn to the left, what animal will you see?")
  • Answering yes/no questions:  (e.g., Can you buy pizza at the zoo? Are the leopards at the zoo?)
  • Answering wh- questions:  (e.g., Which animal is closest to the rhinos?, Where would you go if you wanted a drink?)
  • Comprehension questions:  Read the information/rules section (if your map has one) to students or have students read the section.  Ask comprehension questions.
Expressive Language:
  • Pick five animals from the map.  Have students describe the animals using as many features as they can.  (or grab your EET kit!)
  • Give a student two animals.  Have them give directions from one animal to the other.
  • Have students pick an animal they've never heard of (my map has animals like "Capybara," "Kookaburra," "Aldabra tortoise," "Muntjac deer," and "Patagonian cavy").  Get to your computer or iPad and look up the animal.  Have students report back to the group (or to their teacher) what they learned about the new animal.
Executive Functioning:
  • Have each student tell you their favorite animal from the map.  Ask them to make a plan as to how they will see each of the animals by using the shortest route on the map.
  • Provide a scenario where each student gets a certain amount of money and give students a list of costs associated with the zoo.  Have them make a plan regarding what they will spend their money on (rides, lunch, gift shop).
Articulation:
  • Find animals and locations on the map that contain your target sound (e.g., lion, lemur, llama, leopard, reptiles, buffalo, turtle, eagle, etc.).
Voice/Fluency:
  • Use any of the above activities for students to practice their strategies.

What do you think?  Do you use maps in therapy?


Tuesday, August 6, 2013

Letterboxing, Part 2 (Incorporating into Speech/Language Therapy)

Warning:  This post will make a lot more sense if you have already read my post Letterboxing, Part 1. :)

Yesterday I shared a little bit about Letterboxing with you.  As soon as I heard of this activity, I knew it could have amazing applications in speech and language therapy sessions.  However, most of us can't just take our kids on scavenger hunts all over town...I mean, that would likely take WAY more than the standard 30 minute speech session would allow!  So, how can you incorporate Letterboxing into your therapy sessions?  Easily!  Instead of having your students Find Letterboxes, have them Plant one!


Think about it...every Letterbox out there was put in its location by someone.  Each of the clues on the site were written by someone!  Why not you and your students?  Public schools are, by definition, on public property.  You could plant a Letterbox without even leaving school grounds!  Also, have you checked out some of the clues?  They range from really simple (Go to X location. Look for Y landmark. Find Letterbox) to complex.  Some include a history of the location, some are elaborate fictional stories about the location, and some take you to on (what feels like) an expedition!

Planting a Letterbox in Speech:

  • First of all, I recommend this activity for grades 3 and up.  However, once you have planted the letterbox, you can go "find it" with some of your younger groups.  
  • You may also wish to get permission from your principal. Once you get the OK...
  • Explain Letterboxing to your kids.  You could even stage a mock indoor letterbox for your students to find so they get the idea. 
  • Take your sessions outside and decide on a location.  You can even do this with multiple different groups and then have the students vote on their favorite location.
  • Create your box.  You can view the Letterboxing website for some information on planting clues. I recommend a box that you know will be air/water tight and putting the items in a Ziploc bag within the box.  
  • Decide how much information you want your students to include in the clues.  (This may vary between groups.)  Some ideas:  a brief history of the school, students's favorite things about the school, a short bio on the person for whom the school is named, etc.  Help the students research and start writing the information you decided to include, as well as the clues to get to the box location.
  • Do a walk-through of the clues with the students.  Follow the directions as literally as possible.  This will help the students see which directions may need to be clarified.
  • Once your clues are completed, plant the box and upload your information to the Letterboxing website.  You may want to check your box once in a while to see whether or not you've had visitors.
  • Use the clues with your other groups, especially those that are working on auditory comprehension and following directions!  


You can target so many goals by planting a Letterbox (expressive language, receptive language, giving directions, following directions, written language, carryover of any skill, etc., etc., etc.)!  Do you think you could plant a Letterbox with your students?

Monday, July 1, 2013

Don't Throw it Away! Paint Sticks

Last year my family moved to a new house and we painted pretty much every room in it!  (Ok, so my husband and brother-in-law did the actual painting...).  Needless to say, after many, many trips to Home Depot, I ended up with a ton of extra paint sticks.  


Being the hoarder I am creative and thrifty, I saved them!  If you have extras, you should save them too!

First up, I used to work in a class where most of the kids had communication books.  Once the kids started to learn to put symbols together, we used the paint sticks rather than sentence strips.  We attached velcro to each side ("hook" Velcro on one side and "loop" on the other).  The child would create their sentence on the paint stick, take it off of their book (which also had Velro on the cover), and hand it to an adult.  The paint sticks are much sturdier than anything else we have tried for the purpose of combining picture symbols!


Next, I have a group of students who are, for lack of a better word, blurters!  They spend my entire session talking over each other!  To alleviate this, I created a "Talking Stick" using a paint stick and some colorful duct tape:


It's not very fancy, but it WORKED!  They started waiting for other children to finish speaking and asking for the stick so they could have a turn talking!


Similar to my talking stick, Maureen from The Speech Bubble created these cute "Sticky Sticks." These are similar to my Talking Stick, but you add a suction cup to one end and you can use them to pick up articulation cards!  Head over to her post to find out  more.


And finally (thank you Jenn from Crazy Speech World for reminding me of this one!)...Story Sticks!  For my version, I just attached Velcro to one side and created small images using either Boardmaker or LessonPix.  You can use these to sequence events in a story or for story retelling.  This is the one I use with "The Gingerbread Man":


Check out Jenn's much cuter version of a story stick HERE.


Do you have any other ways of using left over paint sticks?  I'd love to hear them!!


Wednesday, June 26, 2013

Guest Post: Tiered Vocabulary Instruction in Middle School {by Jess of Figuratively Speeching}

Today's guest post is brought to you by Jess from Figuratively Speeching. Jess has been a Speech-Language Pathologist for 18 years, graduating with her Masters Degree in 1995. She has worked in private practice, a private special education school, as a contractor, and in a public school district. She loves her career and spends a lot of time creating her own materials. 


I don’t know about you, but with the implementation of common core, high stakes testing, and teachers complaining about you pulling their students out of class, justifying my services to teachers and administrators has become an almost daily part of my job. The principal stopped me one day to say, ”Teachers are complaining that you are pulling students out of their classes and they want to know what you are teaching their students. How are they supposed to make up the work they miss? You need to do their classwork with them and make sure they don’t miss important concepts.” I am not a classroom teacer, nor am I an aide. My groups consist of three to five students from at least two different classes, and at times, three different grades, so you can guess the thoughts running through my head, “How will I do their classwork and work on the prerequisite strategies my students need to be able to learn their vocabulary, comprehend multiple step directions, retain information, improve grammatical skills, work on fluency and articulation…. ?” My mind was spinning out of control!


When I first began working in the Middle School, I realized that pull out sessions, while wonderful and intensive and giving me the ability to hone in on their specific skills, did not allow me much opportunity to collaborate with teachers. I began pushing in to the three grade level self-contained classrooms so I could see the topics and vocabulary introduced and then work on those skills in therapy. But, at annual reviews, vocabulary testing did not show as much progress. Why not? I did not address much in the way of Tier 2 words, those words that are not academic core vocabulary words that teachers need worked on for their high stakes testing and to show improvement over the course of the year for themselves. Our testing does not typically include those tier 3 words. If you don’t know about tiered vocabulary, here is a link to an article that will explain it.


What now? While I still pushed into the classroom, my sessions incorporated the concepts taught, but not necessarily the vocabulary. For instance, I love the 6th grade social studies curriculum, learning about the ancient civilizations. There are so many ways we can address our goals while helping students retain information from their classes. While my student learned about Mesopotamia, I taught them Tier 2 words my students would need to know to be able to respond to questions on tests, such as analyze, classify, compare, contrast, discuss, evaluate, explain, illustrate, justify…. You can find a packet with those words and more on my freebie tab here. We worked on comparing and contrasting information, how society today compared to Mesopotamian society, responded to questions from nonfiction articles, made flip books with vocabulary, etc. Here is a template of a flipbook I created:


As the children moved onto each new culture, we reviewed new material and compared it to previous cultures. It was a lot of fun. The students remembered information from all of the different societies, I addressed my goals, the teachers were happy that I could show them that we worked on material related to their classwork, and my principal came in to observe and was thrilled with my lesson. Annual review time came about, and lo and behold, there was progress in all areas. Tier 2 vocabulary had been addressed, I was able to incorporate academic work, and I could show progress in all areas, not just vocabulary.

Now, just because I incorporate curriculum content does not mean that I do not want my speech sessions to be fun. Here are three activities that I incorporated into my sessions:


1. Scattergories: Have students work alone or in pairs for this activity. For fun, I use the original game rules, where you pick a letter (I wrote out letters on index cards, folded them, put them in a container, and then picked a letter from there) and each student or pair has to write down items from as many categories as they can with the letter chosen. This can be tough, depending on the categories chosen, but I like it for word retrieval, vocabulary, as well as creative thinking. Another way I have used this game is to have the ten categories include topics from their classwork. In the middle school, I like to use their science and social studies curriculum.

2. Create-your-own Books: I love being crafty, but my Middle and High schoolers roll their eyes at me if I suggest making something even remotely crafty with them. They do like making different types of books that incorporate their curriculum. Flip books are one example of books I use with them. They are wonderful for vocabulary, but you can also use them for sequencing information about a topic or the steps required for an activity, grammar, and so many more ways. See the above picture for an example of how I make a flip book.

3. Jeopardy-like games: This has always been one of my favorite games to do with students. It is a quick way to assess their knowledge of vocabulary and other topics, and my students always love to compete against each other. You can make it as high-tech (power-point) or low tech (index cards on a magnetic board or library pockets mounted on poster board with questions in the pockets) as you would like. Keeping track of data is easy with game formats like these, and the questions can be presented throughout the unit to demonstrate progress.

~ Jess

Thank you Jess! You can follow Jess on her blog, Figuratively Speeching, on Facebook, and on TPT.

Tuesday, June 25, 2013

More Pirates, Matey! {Freebie included!}

Disclaimer:  This post contains affiliate links to Amazon.com for your convenience.

During the last two weeks of school, I've been using a pirate theme in my sessions.  The kids have been having lots of fun with it!


Here are some of the books I've been using:

Of all the books, Pirate Pete was probably the favorite of the week!  I bought this book after reading this blog post from Jenna at Speech Room News (the cover is different, but the book looks to be the same).  


This book has pop-out pieces that you insert into a slot to tell your own version of the story!  Here's my son having fun with the book - he's adding a party hat to the girl pirate's head.


There are six pop in the slot pieces per page (I laminated them to make them more sturdy).  My kids each got to pick a different object/page and then they had to "read" the page with their object (e.g., "She had a party hat on her head!").

We played a few games this week too.  I used a variety of activities from some of my favorite SLP bloggers, including some from these packets:


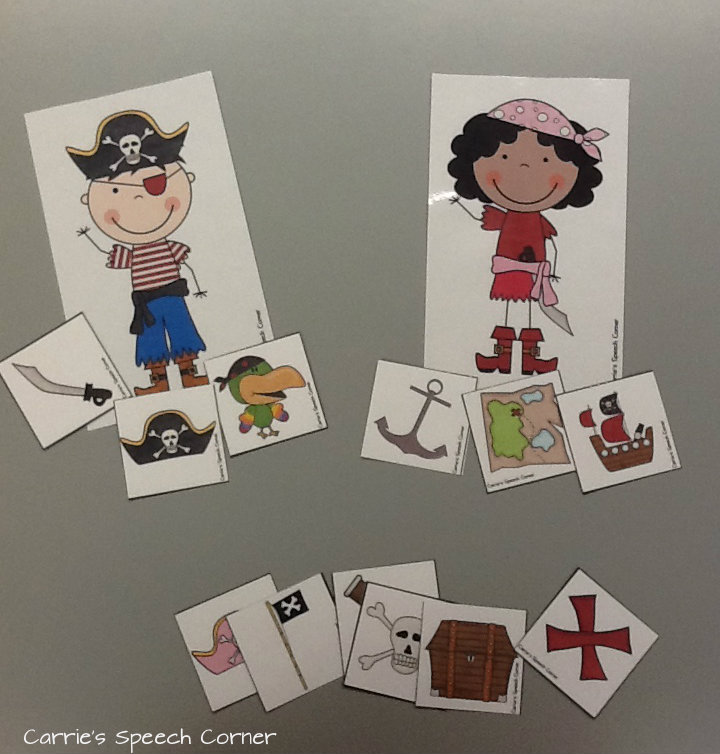
In addition, I created these adorable boy/girl pirates with my Cricut Expression (They're from the Paper Doll Dress Up Cartridge).  I also created some pirate-themed object cards.  We took turns giving objects to the pirates and practicing pronoun use (e.g., "She has the spyglass" or "He has the map").


Don't have a Cricut?  No need to worry!  Here's a printable version of this activity that I created:


You can download this activity HERE.

If you download, leave me a comment!  What are your favorite pirate-themed activities?


Monday, June 24, 2013

Guest Post: Fluency Tips and Tricks {by Maureen of The Speech Bubble}


Thanks so much to Carrie for including me in her 'Bloggy Birthday' celebration! Congrats!   My name is Maureen Wilson M.S., CCC-SLP and  I am a school-based SLP.  I write the blog, The Speech Bubble :)


Today I want to share some tips and resources that I have found to be helpful when working with students who stutter.  Fluency can be a tricky and complicated area. In the schools, opportunities to work with fluency students can be scattered, making it difficult to gain knowledge and experience. Here are some points  I have picked up that have been helpful to me when working with this group.

Does the student already have diagnosis?
Does the student being brought up for fluency concerns already have a diagnosis of stuttering?  If not, that means that you will need to do some screenings or testing. Remember, RTI can be used with fluency students too!  If the student can read, I like to use the 'Rainbow Passage' as a screening tool.  If they cannot read, picture description is a great way to obtain a speech sample.  Make sure you note any disfluencies, the type of disfluency and length of occurrence, as well as % of stuttering.  A good sample should be at least 100 syllables in length and you should aim to get at least 3 samples.

Does the student receive outside speech therapy for stuttering?
If you receive a request to see a student for fluency, check to see if they are currently seeing an outside speech therapist.  If the parent grants consent, touch base with the outside SLP and collaborate on goals and strategies. Find out what has and hasn't worked for the student.

Observe and Ask
Make time to observe the student in different settings.  I know this can be difficult with our schedules but it really can provide lots of useful information. Watch the child's body language and amount of class participation. Do they play with other students? Answer questions?  Ask the student how they feel about their stuttering. I have had student who truly did not care one bit that they stuttered and others who would be on the verge of tears if you asked them a question.  The student's feelings and perceptions are powerful factors in designing their treatment plan.

Secret Signals

Once your student has begun to master their fluency strategies inside the walls of your speech room helping them transition these skills into the classroom is key.  A strategy that my students have had a lot of success with is using a 'secret signal'.  One of my students compared it to having a personal 'Bat Signal', ha.  You, the teacher, and student create a secret signal that the teacher will use when the student needs a reminder to use their fluency strategies in class. A quick tug on the earlobe has been the best one so far.  It is discrete and gets the message conveyed.

So what materials are out there to help you address your student's fluency goals? Lots!  Here are some of my favorites:


For more information and resources about stuttering check out:


I had done a post awhile ago about a friend of mine who has stuttered his entire life. He shared his experiences and advice on the subject, as well as, some video before and after he attended an intensive fluency program. You can check out that post here.

~ Maureen


First of all, Thank you so much Maureen for sharing this wonderful information!   You can find Maureen's blog, The Speech Bubble, on Facebook.  Make sure you check out her Teachers Pay Teachers Store as well for some fantastic materials!

Second, if you have not seen it, you NEED to check out the video that Maureen posted on her blog.  It's simply amazing and truly inspirational!  


Wednesday, June 12, 2013

AAC Week: Moving Beyond Requesting

PECS: The Picture Exchange Communication System was developed by Lori Bondy and Andy Frost.  In the first phase of the six phase program, a student learns to exchange a picture of a favored item for that item.  In Phase two, they learn to extend this skill to communication partners that are across the room and to repair communication breakdowns.  In Phase three, students learn to discriminate between pictures of desired objects and pictures of objects that are not desirable.  In Phase four, students will learn sentence structure by using pictures to create simple sentences.  In Phase five, they lean to respond when given the prompt "What do you want?"  In Phase six, students learn to comment, first in response to questions and then spontaneously.

PECS... Picture Exchange Communication System.... A student gives another person a picture (or pictures) in exchange for something they want.  The concept practically implies requesting, right?  But how many children do you know that only make requests in their daily interactions?

Photos used for picture exchange.

In the 15 minutes before bedtime last night, my son (three and a half years old) used language to:
  • Request
  • Comment
  • Label
  • Question
  • Protest
  • Reject
  • Deny
  • Greet


For many students, following the PECS protocol to the letter will be important.  However, if you are using PECS as a means of facilitating (or augmenting) communication rather than as an alternative means of communication, you might want to introduce commenting and other communicative functions a little earlier!

Here are some ways to expand your use of picture exchange (or even picture supports) beyond requesting:
  • Use "My Turn/Your Turn" symbols while playing a game to facilitate social interaction.
  • Use pictures of emotions with "I am" to assist children in expressing feelings.
  • Have symbols that describe taste (e.g., yummy, yucky, sour, etc.) available during meal and snack times.  Try different foods and describe their tastes.
  • While playing with cars, have symbols available for "crash" and "oh no!"
  • During any activity, allow the child access to symbols that say "Yay!," "Oh no!,"  "Oh man!," "I like it!," "I'm having fun," "boring," etc.
  • Check out this post from CC at If Only I Had Superpowers on using picture symbols to increase use of attributes and expand sentence length.


What else are you using picture symbols to target besides requesting?


Related Posts Plugin for WordPress, Blogger...