Tuesday, February 26, 2013

App Review and Giveaway: Sunny Articulation Phonology Test


Today I'm going to share another FABULOUS app by Smarty Ears - The Sunny Articulation Phonology Test ($59.99 in iTunes).  According to the developers, this app is designed "for screening, identification, diagnosis and follow-up evaluation of articulation skills in English speaking individuals" and "can be used to identify articulation errors patterns in children as well as adults, while supplementing data obtained from standardized assessments."  It is designed for use on the iPad, iPhone, and iPod Touch.

Now I'm going to walk you through the Sunny Articulation Phonology Test (SAPT).  Please bear with me.  This is a very thorough application and I want to do it justice!


Getting Started


When you open up SAPT, you are brought to this screen where you will add your students and set your preferences:


Notice the "Info" button on the top left side? Tap that button and you will be shown the drop down menu below:


Facebook:  Takes you to Facebook so you can "Like" Smarty Ears.

Video Tutorial:  When an app provides you with a video tutorial, it's always a good idea to watch! You can also watch this tutorial on the SAPT information page of the Smarty Ears website.

Manual:  There is a 26-page manual on the SAPT available here.

More SLP Apps:  This will give you a list of other available apps by Smarty Ears

Contact Us: You can select this option to quickly contact Smarty Ears for support if needed.


From the main screen, you can also change the settings of the SAPT app:


Transition Audio:  In the default setting, transition audio is on.  This will provide verbal reinforcement (e.g., "good job") every time you transition from one target word to the next.  Turning it off will provide no reinforcement.

Record Single Sound:  With this option turned on, you can record your student's productions in one audio file without needing to tap record for each individual word.  If it is turned off, you will need to tap the record button for each word you wish to record.

Display Written Word:  With this option "on," the printed word is displayed below the image for each stimulus.  Turning it off will give you only a picture stimulus.


Now you should be ready to add a new student.  You must create a profile in order to begin.  Simply tap the "Add Student" button in the lower left corner and a pop-up box appears:


Add the student's name and date of birth and tap "ok."  You will then be asked if this student is a native English Speaker:


Remember that non-native speakers of English will have articulation differences that may or may not be considered a disorder.

Administering the SAPT


Once you select a student, tap "New Test" (below the settings button).  You are given the option of completing a full evaluation or a shorter screening.  Smarty Ears estimates that a screening can be conducted in 4-8 minutes, and a full evaluation can be completed in 9-20 minutes.  Time estimates are dependent on the student's cooperation, whether or not you are using sample recordings, and how many of the student responses you record.  I'm guessing it would take longer if you have a student who produces multiple sound substitutions versus just a few.


In either mode, the student is shown an image and the word is transcribed phonetically above it.  The targeted phonemes are highlighted in green.  To mark a phoneme as incorrect, tap it and it will turn red.  The red dot in the upper left hand corner allows you to record a student response.  The blue arrows along the bottom allow you to scroll between stimulus items.  If a student says a word correctly, you just move along to the next image.  If the student doesn't know the word, they can tap the image to hear a modeled production.


One of the coolest features is this little button here (circled in pink).  Tapping this switches the phonetic transcription upside down.  This way, if you are seated across from the student, you can see the transcription!


You can also (in either mode) tap the little note icon and add additional information:


In the Full Evaluation mode, there is a slight difference in marking responses.  In this mode, you can qualify the incorrect responses. For example, I administered the SAPT on my 3-year-old son.  He wasn't sure what a vase was, so I showed him how to tap the picture to hear the word.  His response was "FACE?!? That's not a FACE!"  (He's got a cold so I'm doubting he's hearing correctly at this point, lol).  Anyway...I wanted to mark /v/ as incorrect, so I made it red.  You are then prompted to state if the error was a deletion, distortion, substitution, or assimilation.  Common phonological errors are also listed for options.  

I selected "Substituted" as the error pattern, but I could have simply tapped "Devoicing."  Since I did tap "Substituted," I get a list of phonemes so that I can indicate the sound that was used:


Here I selected the /f/.  

Another nice feature is that you can leave the test and return to it at another point.  The app will pick up right where you left off.  When you reach the last item, you will see this button ("Result") instead of a blue arrow.  Tapping this will conclude your screening or evaluation.


Obtaining the Results


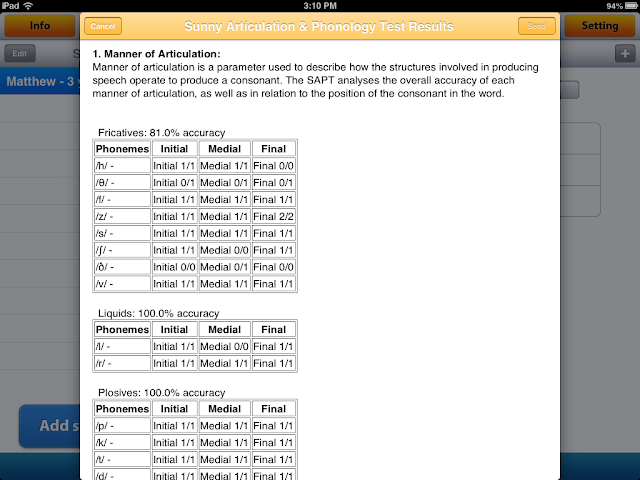
Once you tap "Results," you will be asked to provide a subjective rating for the student's overall intelligibility (with a percentage). After that, you will be able to see the student's results, broken down in several different ways.  For the screening, you are given 5 different result screens:

Position:  This calculates the percentage of correct productions by word position (initial, medial, and final)


Manner:  The student's accuracy by manner of articulation is displayed (fricatives, liquids, plosives, nasals, affricates, glides, and clusters)


Voicing:  Data for the student's accuracy with relation to voicing is displayed.


Words:  The complete word list for the screening is displayed, along with the correct/incorrect markings.


Place:  Accuracy in relation to place of articulation is displayed.


In the Full Evaluation mode, a sixth display is added:

Error:  Here you can view error patterns based on your assessment:


What to do with your results? 


Once you have completed your screening/evaluation and reviewed your results, you have several options that are available by tapping the "+" button:


Review Notes:  Here you can see all of the notes that you added while administering the screening/assessment

E-Mail Results:  This feature is AMAZING!  We've all seen apps that allow you to email data to yourself. Usually you get a table.  With SAPT, you actually get a fairly detailed REPORT!!  I only took shots of the first two screens, but the email will contain all of the information from each of the Results screens above, plus  a chart of developmental norms.  I don't love the norms chart, but you can always take it out of the report.   I put these screenshots as large as I could so you can get an idea:

email screen 1

email screen 2

Review Audio Recordings: If you chose to record a student's productions, you can go back and review them here:


Open in:  This is where you go to print (if you have AirPrint capabilities).  You can also open the report in other apps, depending on what you have installed on your iPad.  I was given the option to open in iBooks, Kindle, or Dropbox.

Open in TRC:  You have the option of opening the report in the Therapy Report Center app from Smarty Ears (Free in iTunes).  To do this, you must first have the student entered in the TRC.  Then you can export your data (from this app and many other Smarty Ears apps) and have all of your data in one convenient place!


What I Think

The Pros:
  • Screening and Full Evaluation in one app makes the SAPT very versatile
  • Administration is quick and easy (not to mention motivating for the students)!
  • Real-life photos are used.
  • The comprehensive breakdown of results by place, manner, voicing, word position, and error pattern.  This allows a treating therapist to analyze patterns and determine therapy targets very quickly!
  • The ability to record and save productions.  
  • The ability to tap and hear a modeled production when a student doesn't know a word.
  • Compatibility with the Therapy Report Center.  
What I'd love to see in the future:
  • I know this is dreaming big, but I would LOVE, LOVE, LOVE to see the SAPT standardized!  The app already gives you a raw score, but that doesn't take into account age/developmental expectations.     Imagine if it also provided standard scores and percentile ranks!
  • I'd also love to see the option of turning off the modeled productions that can be heard by tapping the stimulus picture.  I administered this test to my son right before his nap time.  He found it absolutely hysterical to tap the photo over and over and over and over and NOT say the words himself.  

The Bottom Line:

Oh! My! Gosh! This app is incredible!  Talk about a comprehensive way to analyze a student's articulation skills!  I love that, in the full evaluation mode, you can qualify incorrect responses.  This is a huge plus in relation to other articulation screening apps that I have tried.  The app isn't standardized, which means I can administer to students to determine targets, monitor progress, and collect data for progress reports without obtaining consent to test (a requirement in my district for administration of standardized testing).  This app is a great alternative and definitely a bargain in comparison to the traditional articulation and phonology tests!  

Think you can use the SAPT in your speech room?  Mary from Smarty Ears was kind enough to provide me with a code for a giveaway as well!  Enter using the Rafflecopter below!


Disclaimer:  Although Smarty Ears was kind enough to provide a code for this app review, and another for the giveaway, the opinions expressed in this review are mine alone.  


Monday, February 25, 2013

App Review: Eye Paint

This post is partly an App Review and partly a "This Worked for Me" post.  Why?  Well, this app isn't a speech-specific app, but I decided to give it a try one day and I'm glad I did!  

Eye Paint My Diary is the latest in the Eye Paint series by Curious Hat.  The others include Eye Paint Animals and Eye Paint Monsters.  A while ago, I was contacted by the app developer, not to ask me to write a review, but to inform me about the launch of the app.  It looked really cute, but I didn't immediately see the therapeutic applications.  Just the other day, I was contacted again to let me know that Eye Paint My Diary had gone free for the day.  I decided to check it out and was pleasantly surprised!


On first sight, the Eye Paint applications appear to be a coloring page type of app.  The major exception is that, instead of using a palette and your finger, you use your iPad's camera to add color!  When you open up the app, there's a caterpillar-type of creature along the side.  Drag him up/down to see the different scenes you can chose.


I chose this one:


To fill in the color, simply tap the area you want to color, then press the camera icon.  As you can see, when I tapped the cloud, my iPad was pointed at my stairs.


Here's the completed scene I finished before school the other day:


And these are the things I used to color the picture:


  • Red Rainbow Stripe - student chairs
  • Yellow Rainbow Stripe - banana
  • Green Rainbow Stripe - pencil case
  • Blue Rainbow Stripe - folder
  • Purple Rainbow Stripe - hand sanitizer
  • Clouds - cotton balls
  • Bunnies - for one I used my gray table, for the other (and the ladder), I used my wooden desk top.

Just in trying this app for the 5 minutes it took me to create this picture, I thought of a bunch of ways it can be used in therapy!

  • Following Directions:  Give your students directions like these:  Find something fluffy to use for the clouds. For the bunny, find something that you can read. 
  • Similes:  Encourage students to create similes to describe their paintings.  (e.g., "My clouds are as fluffy as cotton").
  • Formulating and Expanding Sentences:  Encourage students to create sentences to describe their pictures.  Encourage them to use similes to expand upon their original sentences.
  • Executive Functioning/Pragmatic Language:  Encourage students to pick a scene and then make a plan regarding how they will fill it in.  Encourage them to work together to decide what colors they want for each section and what objects they can find to create those colors.  You can also have students leave your speech room and ask other staff members for assistance in finding objects (e.g., ask the gym teacher for an orange basketball).
  • Carry-over activities:  Use as a carry over activity for articulation or as an activity to practice voice/fluency strategies

What do you think? Can you think of any other ways you would use this app in your therapy room?

Thursday, February 21, 2013

How I Organize TPT Materials

I've heard a lot of discussion lately about how to store those TPT packets, especially when you have a small space.  I figured I'd share how I organize my materials and maybe you'll find something that could work for you!  

For starters, I print and laminate the materials I plan on using (I do not always print the instruction sheets and I do not print sections that I think will be too difficult/too easy for my kids).  When I first started printing various materials from the internet (pre-Pinterest and pre-TPT), I used these large mailing envelopes.  I wrote the topic and contents on the front of the envelope.  


It may be difficult to see in this picture because they are the same color as the envelopes, but I use sheets of cardboard (from the bottom of water bottles) as dividers.  They are labeled with categories like Animals: Zoo, Animals: Farm, Books, Seasonal/Holiday, Articulation, Language Concepts, Games, etc.  I put them in these build-it-yourself shelving system I got at Target when they have their back-to-school college dorm items.  The one above is on top of my closet.  

Well, I ran out of envelopes, so I started using the gallon-size Ziplock bags.  I actually like these so much better because I can see what's inside!  Since I'm running out of space in the shelves above, I started putting some into theme-based binders.  You can place duct tape on one end of the Ziplock bag and hole-punch through it (I got this idea from Speech-Language Pirates). Here's a peek at my Thanksgiving binder:


I have more materials for some themes than for others.  For those themes that have a lot of materials, I use plastic storage containers like these:

(Click image to view on Amazon)

What about the materials you're using or about to use?

Here's how I keep the "What we're doing this week" items:


They're basically in a mail organizer I got from a local odd-lot store and I keep them on the shelf right behind my chair so I can just turn around and grab what I want.


And I store the "What's we'll be working on soon" in a dish-drainer organizer on another shelf.


In the silverware cup, I store my baggie of game pieces.  These are what I use for those open-ended game boards.  The baggie contains several game die, and game pawns.  I've been using those little rubber erasers as game pawns to make it more interesting for the kids.  I have transportation and animal themed erasers.


 I think that's about it!  How do you store your printed materials?

Tuesday, February 19, 2013

Rhyme Time {FREEBIE}

February is almost over and March is right around the corner.  Classrooms across the country will be celebrating a certain author's birthday at the start of March.  You know who I mean, right? ;)  To accompany books you might be reading this month in your speech rooms and classrooms, I've created this simple rhyming activity:


There are 16 pairs of rhyming words (32 cards total).  Here's an example:


You can use the cards as a memory game, with rhyming words being a match.  You could also use the cards to play Go-Fish ("Do you have a word that rhymes with box?").

Here are some ways in which you can expand on the activity:

  • When students make a match, ask them to name another rhyming word.
  • Ask students to provide a synonym, antonym, and/or association for each word they select.
  • Use only the nouns.  Ask students to formulate a sentence using the two words (e.g., "A mouse lives in a small house")
  • Use only the nouns.  Ask students to describe the object using a specified number of salient features.  You could assign points for each feature given.

You can grab this free download HERE.  If you do, please leave a comment or feedback!


Wednesday, February 13, 2013

Book of the Week: The Day it Rained Hearts (And other Valentine's Day Activities)

Finally back to normal and caught up from the blizzard.  Time to start writing new posts!  I figured I'd share with you the book I plan on using tomorrow during my therapy sessions:


"The Day It Rained Hearts" by Felicia Bond is one of my all-time favorite Valentine Stories!  You can probably guess by the title and the cover picture what happens in the story. ;)  The little girl catches hearts that fall from the sky and sorts through them to make very special Valentines for each of her friends.

I have to stop here for a minute and tell you one of my favorite kid-quotes EVER.  A few years ago I was supervising a graduate student clinician, Jenn (she now works for my district and has written a couple of guest posts for me).  Jenn was using this story with a group of kids.  She drew their attention to the cover and asked them to predict what would happen in the story.  One little boy (who recently had broken his glasses) shouted out, "That duck is gonna get hit by all them apples!" LOL!  Kids are so funny!

Back to the story...The author describes what the little girl does to create each card.  I usually tell the kids that the girl's friends are all animals and ask them to guess which animal the card might be for.  You don't see the completed Valentine until the recipient receives it in the mail, so this can be challenging.  I made replicas of the Valentines in the book so we can discuss them a bit more after the story:


Can you guess which animal receives these Valentines?  You can use these Valentines to target inferences, providing explanations, using descriptors, etc.

Whenever I do a story as part of my lesson, I usually follow-up with an extension activity.  I have a few Valentine's Day themed language activities that I use with this story or during another session.  Here are some of my favorites...

Valentine Cards


Ever buy these little cards for your kids to giveaway at school (or to give to your kids at school)?  There's always a few left over, right?  Well, there are a few things you can do with them.


1.  Describing Game.  Put all cards in a mini mailbox.  I have a couple of these that I found at Target in the Dollar Spot.  Have students take turns pulling out a Valentine and describing it in as much detail as possible. You can also use sets.  Place one set on the table and the other in the box.  One student takes a Valentine out of the mailbox and describes it, the other students have to guess which Valentine is being described.

2.  Memory Game / Go Fish.  Find pairs of cards.  Glue to index cards or cardstock, cut to uniform size and laminate.  Use to play Memory or Go Fish.  You can work on describing, fluency strategies, articulation carry-over etc.

3.  Sorting Activity.  I use this activity a lot with my just-turned-three-year-olds.  I got these mini bags from Oriental Trading years ago.  I have extras, so I use them for just about everything.  I stapled a different Valentine to each bag and have kids sort into the correct bag.  You could also sort by "category" - Spongebob Characters, Princesses, Animals, etc.


Heart Shaped Go-Togethers


Here's another activity from Jenn, although hers were much cuter than mine.  She used pre-cut felt hearts from a craft store.  I couldn't find felt or foam hearts, but I did find these white ones.  In hindsight, I should have painted or colored them.  They're a bit boring, but they work.  Grab images of things that go together (e.g., tire/car, paintbrush/paint can, bird/nest, etc.).  Place one on each side of the heart.  I used scrapbook scissors to cut the hearts in half so that they were like puzzles:


Inferencing Activity


Last year I found this great inferencing activity from Speech Time Fun.  Listen to the rhymes and try to figure out who the Valentine is for.  Follow the link to Speech Time Fun to access these free printables!


I Only Have EYES for You


One of my very first Pinterest finds was this cute activity from The First Grade Sweet Life.  Listen to the clues and find the animal that is described.


What's going on in your speech room for Valentine's Day?


Related Posts Plugin for WordPress, Blogger...