Showing posts with label DIY. Show all posts

Monday, July 1, 2013

Don't Throw it Away! Paint Sticks

Last year my family moved to a new house and we painted pretty much every room in it!  (Ok, so my husband and brother-in-law did the actual painting...).  Needless to say, after many, many trips to Home Depot, I ended up with a ton of extra paint sticks.  


Being the hoarder I am creative and thrifty, I saved them!  If you have extras, you should save them too!

First up, I used to work in a class where most of the kids had communication books.  Once the kids started to learn to put symbols together, we used the paint sticks rather than sentence strips.  We attached velcro to each side ("hook" Velcro on one side and "loop" on the other).  The child would create their sentence on the paint stick, take it off of their book (which also had Velro on the cover), and hand it to an adult.  The paint sticks are much sturdier than anything else we have tried for the purpose of combining picture symbols!


Next, I have a group of students who are, for lack of a better word, blurters!  They spend my entire session talking over each other!  To alleviate this, I created a "Talking Stick" using a paint stick and some colorful duct tape:


It's not very fancy, but it WORKED!  They started waiting for other children to finish speaking and asking for the stick so they could have a turn talking!


Similar to my talking stick, Maureen from The Speech Bubble created these cute "Sticky Sticks." These are similar to my Talking Stick, but you add a suction cup to one end and you can use them to pick up articulation cards!  Head over to her post to find out  more.


And finally (thank you Jenn from Crazy Speech World for reminding me of this one!)...Story Sticks!  For my version, I just attached Velcro to one side and created small images using either Boardmaker or LessonPix.  You can use these to sequence events in a story or for story retelling.  This is the one I use with "The Gingerbread Man":


Check out Jenn's much cuter version of a story stick HERE.


Do you have any other ways of using left over paint sticks?  I'd love to hear them!!


Monday, May 13, 2013

Don't Throw it Away! Milk Bottle Caps

I've been saving the caps from my milk bottles for a while because I wanted to make those cute ladybugs that are all over Pinterest.  Well, I tried and had a Pinterest FAIL!  Basically, I tried drawing the dots on with a Sharpie, but the color didn't stick.  So, what to do with a whole bag full of milk bottle caps?

Make a therapy activity!

First, you'll want to wash your milk caps and let them dry.  Gather the amount you want - the number doesn't really matter.  More caps = longer activity, less = shorter activity!  You'll also want some circle stickers.  I used the kind used for labeling prices at yard sales.


I wrote the numbers 1, 2, and 3 on each...


Place one sticker on the underside of each cap and you're ready to play!  You can use this simple game as an open ended reinforcer for just about any target.  Once a student completes targets, they can turn over a cap.  They get the number of points indicated on the sticker.


The student with the most points at the end of the game is the winner!

If your kids aren't fans of "point" activities, there are other variations you could use.  You could hide one "target" (Dora, Spongebob, a star, etc.) and the person who finds the target is the winner.  You could also play similar to "Lids & Lizards" by Super Duper - place stickers under only some of the caps.  The student who found the most stickers at the end of the game is the winner.

There are some other cute ideas for using milk bottle caps on Pinterest.  Here are a few:

  1. Alphabet Stamps
  2. Hungry Caterpillar Activity
  3. Counting Game
  4. Magnet Boats
  5. Word Families Activity
Do you re-use milk bottle caps?  What are you using them to do?


Tuesday, April 2, 2013

Don't Throw it Away! (Calendars)

I probably should have posted this back in January!  However, on the off chance that you haven't gotten around to throwing out your old calendars, DON'T!  They're another great resource for DIY therapy materials!

Here are some examples from calendars I had:


How cute are these puppies?  Aside from being adorable, check out their faces.  You can use them for describing emotion, describing how you think they would/should feel in different situations (remember, you have 12 pictures!).  You could use them to teach adjectives as well:  sleepy, playful, spotted, etc.


I found the calendar above at the dollar store.  In each picture, some of the friends (a giraffe, bear, duck, and bunny) are pictured doing different actions.  These pictures are great for sentence formulation, describing a scene, describing weather, etc.

Have you re-used calendar pages in therapy?  Tell us about it!


PS, If you have an awesome "Don't Throw it Away" tip that you'd like to share in a guest post, send me an email at cmanchester57@gmail.com

Wednesday, March 27, 2013

Don't Throw it Away! (Magazines)

I have a confession to make....

I'm a pack rat!  

I have a hard time throwing things away.  I very often think, "I can use that!"  I'm guessing that some of you might be the same way.  So, here's what I'm thinking.  Once every-so-often (I'd like to say once per week, but I'm not sure I'd be able to stick to it!) I'm going to post a way to re-use/recycle things you already have into therapy activities!  Here's the first - 

Magazines!

You've probably seen posts about re-using your magazines for the pictures and stories.  I save them for the Ads!  


Why?  Well magazine ads are LOADED with higher level language concepts!  What you're likely to find in the ads:
  • figurative language
  • idioms
  • similes
  • metaphors
  • multiple meanings
  • humor
  • and language that requires the reader to take a different perspective/point of view and/or use inferencing skills!


In case you can't read the captions, here's what some of the ads say:

The first picture:
  • Jelly Belly Jelly Beans:  Music to your mouth.
  • Aussie Hairspray:  Don't be hard headed.
  • Excedrin:  Migraines so bad I want to take my head off.
  • Juice:  A full serving of vegetables inside
  • Chewing Gum:  Survive a snack attack

The second picture:
  • Mr. Peanut:  He's famous for two things - Planter's nuts and winning staring contests (Go ahead, try him!)
  • Fresh Step:  It works so well, your cat will need help finding the litterbox.
  • Chips Ahoy:  They go fast!
  • Meow Mix:  Yes, it tastes that fresh!

Do you use magazine ads in your therapy sessions?  What do you use them to target?


PS, Have a great idea for re-using/recycling what you already have for therapy? If you're interested in writing a guest post to tell us about it, send me an email to cmanchester57@gmail.com

Wednesday, January 23, 2013

Using What I Already Have...Differently

Have you seen the post from Miss Speechie at Speech Time Fun on using wind-up toys in therapy?  Well, I have a collection of wind-up toys.  I  use them quite often for PECS reinforcers.  (I know I promised you a PECS series and it's coming!)  I loved this idea, but somehow never managed to use it in therapy...until today!

I was working with a child with a phonological disorder.  We were targeting final consonant deletion.  He first cut out and colored pictures from Phonology Round-Up! from Super Duper. Then I put them in the bottom of a shallow storage bin:


I did find that with the cut pictures, the wind-up toys would get stuck.  So, I slipped a sheet protector over the top...problem solved!  This child had some motor planning issues, so he had difficulty winding the toy.  I wound it for him and he told me where it should start, named the pictures as the toy passed over, and finally named the picture where the toy stopped.

Well, he liked that activity, but I think he liked this one more.  I pulled out my bag of blocks (you know, the 1-inch colored cubes).  He built a tower (or two) in the center of the same box:


When he was finished, he shook the box to knock the tower down.  Then, as we picked up each block, he had to say the picture that was under it!


The more blocks you use, the more practice you get!  I was a little bit surprised how much he liked this "game."  But, it worked for me!  And all using what I already have....differently!

Have you tried something "different" like this? What has worked for you?


PS, I'm hoping to do more activities like this in therapy...changing what I have (even if only slightly).  I'll keep you updated as to what I've liked!

Tuesday, January 22, 2013

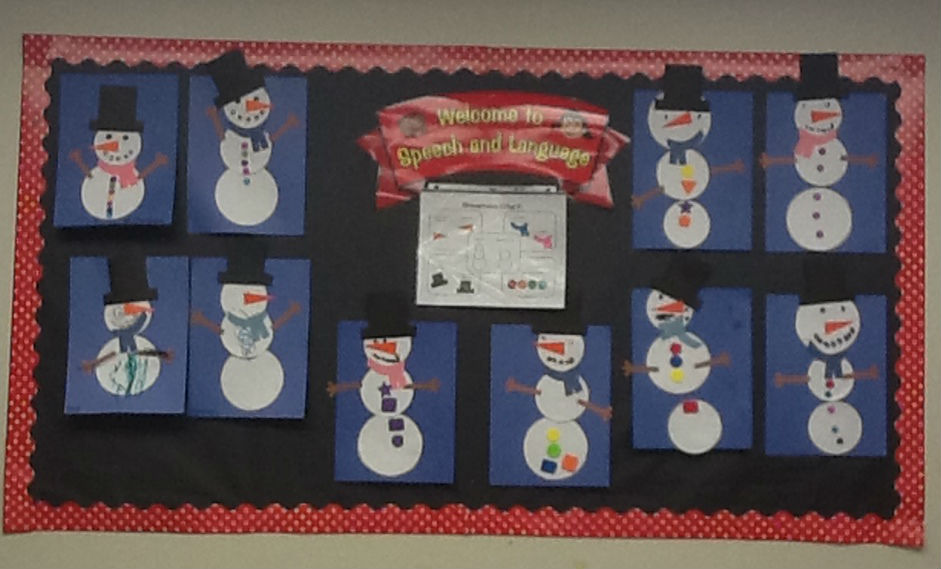
Snowman Glyph

My sample...Yeah, I know, I'm not 7!

I found an adorable Snowman Glyph on Freebielicious (see it HERE) and knew that I wanted to use it in therapy.  However, I knew that the original activity would be too difficult for many of my kiddos, so I adapted it slightly.  Here's what I came up with:


I printed the worksheet in black and white (I don't have a color printer at school) and colored it in.  I cut out all the pieces from Freebielicious in advance and used my Glyph to give the students direction.  They were required to answer the questions using complete sentences and follow directions to make the craft.  The finished product came out cute, don't you think?


Some of the students let me display their work!

Here are some close-up:

Finished snowmen!

I also wanted to create a sheet that would go home with the craft so the parents would understand what we did.  To save trees, I put two copies on a page:


Visit Freebielicious to download the snowman parts.  You can download my glyph visual HERE and the take-home sheet HERE.  Let me know what you think.  Have you used glyphs in therapy before?


Tuesday, January 1, 2013

Low Cost Therapy Materials: Guest Post from Teach Speech 365

Today we have a guest post from Teach Speech 365.  She's the one we have to thank for the Chain-Letter Link Up idea!  Teach Speech chooses to remain anonymous. She graduated with her masters in 2010 and worked in the public schools for 2 school years prior to switching to a private practice. She has experience working with clients ages 2- 21 and adults. She may return to the schools in the future.  She is ASHA certified and has really loved creating and sharing materials with the blogging world.  Take it away!


I have done several posts featuring activities I've created, so I thought it was time to do a blog post about some of my favorite low cost therapy activities.

Ready?


1. Dollar Store Baseball Bases - I found some plastic foam baseball "bases" (Dollar Tree...I think) that I thought would be good to use somehow in therapy. It came with the pitcher's square, home plate, and 3 bases. When I had a group of boys, I pulled them out and laid them out on the floor. They took turns coming up to "bat" and had to answer a question before running/walking to a base. It was easy to adapt to all of their goals and they had a great time seeing who could get the most "home runs."


2. Popcorn containers and bottle caps - I found 4 plastic popcorn containers at the dollar store. I began saving water bottle caps (green and clear) thinking I could use them somehow. For some reason, putting the four containers on the floor and letting kids toss the caps in seems to be a big hit. They particularly like to race to see who can get one in  a container before the other.


3. Tiles - You can pick up single tiles at any home improvement store for around 10-15 cents each. I usually have kids glue some felt onto the back and then let them paint the front. I've also made some sensory tiles by glueing on beans and cotton balls (you could do sandpaper, etc). The kids really like having something to take home with them!


4. Chocolates - I did an activity involving chocolates around Valentine's Day one year. If you are able to use food in your therapy sessions, this is sure to be a hit. I bought a few of those little boxes of chocolates (Russell Stover, Whitman's) that come with 4 pieces. I put them all on a plate and we discussed what filling we thought was in each one. It was great for prediction, vocabulary, and expressive language skills. We then cut them open to see who was right. I made up low tech communication boards with possible fillings, plus some simple sentence strips and a yes/no board using Custom Boards by Smarty Ears. You can grab a copy HERE


What are your favorite low cost therapy activities?


Here are some links to follow Teach Speech 365 on her blog, Facebook page, and TPT store.  Make sure you go "like" and "follow."


PS, Want to know some of my favorite low-cost therapy materials?  Check back next week and I'll share them with you!  Also, if you're interested in writing a guest post, email me at cmanchester57@gmail.com.

Friday, October 19, 2012

Artic Cards

Thank goodness it's Friday...and Thank Goodness for Super Duper's Jumbo Artic Drill Book!!!


Somewhere in my move from one school to another, I lost my /k/ cards!!! Oh the horror!  I have a group of students working on /k/, so we've been using the cards from Artic Chipper Chat until I could find my lost cards.  Well, we're now more than half-way through October and I still can't find them. :(  So, I started making a new set.

Many SLP Bloggers have written about what they use/how they make their articulation cards, so here's my method.  I've been using the Jumbo Artic Drill Book for years to make cards.  I would photocopy the page I wanted (2 copies), color the pictures, paste them on a half index card, then laminate.  I always make 2 of each artic card so we can use them to play memory or go fish.  I'm guessing I'm not alone in that!  Here are some of my /l/ cards:


Fast forward a few years and I'm still using the Jumbo Artic Drill Book to make cards.  The only difference now is that I've acquired the Drill Book Add-on with CD ROM!


Now I can print in color and save myself the step of coloring in all the pictures!!!! (Time saver & life saver! Especially when you lose one of your most frequently used card sets!)


My new /k/ cards in progress:


And completed:


Do you purchase or make artic cards?  If you make them, what's your method?

Thursday, October 4, 2012

Tissue Box Therapy!


It seems that every year, soon after school starts, so do the sniffles!  I have had sooo many kids sneeze, cough, and drip in my room this past week!  Between home and school, I go through more tissues in a year than I could possibly count!  Fortunately, tissue boxes are FANTASTIC for DIY therapy activities!


These are my favorite tissues to buy, mostly because the boxes are so versatile!  Here are just a few things I have made with this type of box:

Dice!  There are so many different things you can do with dice.  For example:

  • Emotion Dice:  Roll the dice and describe a situation that may make you feel the emotion you see.  For very young kids, roll the dice and make a face in the mirror like the one on the dice.


  • Graphing Dice:  I made this one to go along with a thematic unit on pets.  Each child in the group got to roll the dice and add a tally mark to the pet graph.  We then talked about the concepts of more/less and all/none.  You can grab a copy of the graph and dice images here.


  • Question Dice:  I use this one to make answering questions about a story a little more interesting.  Kids roll the dice and I give them a question based on the WH- word they roll (e.g., "Who" --> "Who was the main character of the story?").  Here's a copy of the doc I made for the words.


  • Category Dice:  Write different categories on each side of the dice.  Have students roll the dice and name as many members as they can.

  • Attribute Dice:  Label each side with the following attributes - Color, Size, Shape, Function, Category, and Association.  Pull out an object (e.g., apple).  Have students roll the dice and tell you something about the object based on what they rolled (e.g., Color - red, green, or yellow; Size - small; Shape - round; Function - you can eat it; Category - fruit; Association - like a pear).

*Hint:  When I make dice, I cut a small piece of cardboard from a cereal box (or other similar box) to cover the hole.  The, I wrap the tissue boxes like I'm wrapping a gift (I let the white side show, but you could leave it colorful).  Then I add the images/words I want to the sides and cover the whole thing with mailing tape.  I found that easier to work with than contact paper.


Grab box:  Leave the box as is, or you can use a square of felt with an X cut out of it to cover the hole in the tissue box.  Then you can use the box for any random drawing activity.  This is a great way to make any of your language and artic cards more interesting - place the cards in the box and kids draw one out when it's their turn.


Sorting boxes:  Place icons depicting your criteria on the sides of the boxes and have kids sort appropriately.  I used this activity with my preschoolers when we read "The Napping House."  We talked about the characters in the story and when they were awake/asleep.  Then we used the cards to work on subjective pronouns ("He is awake," "She is asleep").  Finally, we sorted the cards into the appropriate boxes.


Animal Eaters:  I have a few different boxes with open-mouthed animals.  The monkey is from the Kids Express Train music program for SLPs. It's for the song titled "Let's Eat."  We use it to reinforce the concepts in the song (e.g., "The monkey is eating the pizza") as well as present tense/negatives ("The monkey likes bananas" "The monkey does NOT like toast.").  The dog is a simple reinforcer activity from "More Clinician's Choice: Favorite Activities for Speech and Language" published by Communication Skill Builders.


Here's my son feeding the dog :)


If you're still not convinced that saving your tissue boxes is a great idea, here are some tissue box Pinterest finds:


How about this super simple crayon box idea from Money Saving Mom:


And I love these ideas from Crafty Kids with Carey Poppins:


I liked this one so much, it inspired me to create my own frog version:


It's painted with about 6 coats of green paint.  The eyes are egg carton cups, also painted with about 6 coats of green paint and topped with googly eyes.  The tongue is a ribbon, and I drew in the legs.  I thought this might be a cute variation to use with the Articulation Bugs that were posted by Brea at Let's Talk Speech-Language Pathology.


The Big Boxes!


If these are your preferred tissues, don't worry!  There are many ideas out there for them as well!


If you're on Pinterest, chances are you've seen these tissue box monsters from A Day With Lil Mama Stuart.  They're made from tissue boxes and egg cartons.  I've seen people pin these with the idea of using them as "Tattle Monsters" where children suppress the urge to tattle by writing their complaints and feeding them to the monsters.  I've also seen comments about using them to "eat" articulation cards for phrase and sentence level practice (e.g., "He is eating a lemon").  


Here's an adorable reindeer made from a tissue box and popcorn box (as seen on Playing with Words 365). You can use him to go along with Katie's printable book "The Very Hungry Reindeer."


Also the tissue box guitar/ukulele project seen on The Crafty Crow.  


How about these ideas from Simply Crafty (if you follow this link, there are many more ideas!).

Monster Feet
Mater
Rocket Ship


Do you use tissue boxes for DIY therapy activities?  If so, what are you using them for?

Related Posts Plugin for WordPress, Blogger...