Showing posts with label AAC. Show all posts

Wednesday, July 10, 2013

App Review: ProxTalker App Professional Version

Hey everyone!  Remember during AAC week when I told you all about the Logan ProxTalker?  (If not, you can find that post HERE).  I gave you a few ways to create tags for the ProxTalker, including the ProxTalker App.  I'm going to share some more information about the app with you today.  I'll start by going through some of the information on the left side of the screen (below).

"About the App"
About the App:
The ProxTalker App allows you to create communication boards using your own photos and preset symbols.  The boards you create can be organized into books and emailed to yourself, colleagues, and/or parents for printing.  You can use the boards on their own in page protectors, or print on adhesive sheets and use with the blank ProxTalker tags. You can also print on cardstock, laminate, and attach Velcro to the back for use in your communication books!  (That means you don't need to have a ProxTalker to benefit from using this app!)

There is a FREE Lite version of the ProxTalker app available in the App Store.  ProxTalker App Lite comes preloaded with a sample image library of 80 ProxTalker symbols and allows you to use your camera and photos.  There also is a Professional Version of the ProxTalker App that has two larger symbol sets included - SymbolStix and Widgit Symbols.  The Professional Version sells for $199.99 in the App Store.

Symbol Libraries:
If you have the Professional Version, it comes with the SymbolStix and Widgit libraries preloaded.  If you have the lite version, you can purchase one or both of these libraries with an in-app purchase. You can buy the entire Widgit Symbol Set, and/or the SymbolStix library for $99.99 each.

"Symbol Libraries: SymbolStix"
SymbolStix was designed and developed by n2y for use in the popular weekly newspaper "News-2-You" and online curriculum, Unique Learning system.  This library contains over 15,000 symbols.

"Symbol Libraries: Widgit Symbols"
Widgit Symbols have been around for over 30 years and this set contains over 12,000 symbols representing over 40,000 words.

ProxTalker Devices:
When you tap this button, you will be able to see information on both the Logan ProxTalker and the Logan ProxPad choice maker.

"Logan ProxTalker"

"Logan ProxPad choice maker"
How to Create Boards:
Tapping this button will give you a tutorial on how to create boards and books using this app.  I recommend that you begin here and go through the tutorial before creating your boards.


Create Boards:
Tap this button and you will be able to start making boards and books.  Essentially, a book is made up of a collection of boards.  You must start by creating a book.  You can choose the name of the book, the size of the tags, the book orientation, and text position, and whether or not you want to include cell borders (you wouldn't want them if you are printing on adhesive labels, but would if you were planning to cut out the symbols).  You can also email the pages for printing from a PC, or use AirPrint if your iPad has that capability.


Once you have chosen your settings, you will have a blank slate.  It's fairly light, but each sell says "Touch to add image and text."  It's as simple as that!  Tap the cell to which you wish to add a symbol.


You can create cells using either a photo from your camera roll or a symbol:


I started by using a photo.  You will need to allow the app permission to access your photos.  Then just pick the photo you wish to use!


As you can see, I chose a picture of Thomas the Train (because it was already on my camera roll!).


I then added the text that would appear on the label and clicked "save."  Next, I tried adding a symbol to a tag.  Here you can see some of the Widgit Symbols that are available:


Some of the SymbolStix symbols:


And some of the ProxTalker symbols:


You can edit the symbol label to say whatever you'd like:


Here is what a completed page looks like:


You can easily add pages to your book by tapping the plus sign in the top right corner.  Notice the dots on the bottom of the page (in the center)?  This will tell you how many pages are in your book and what page you are on.  In the screenshot above, I'm on page 5 of 5.  Here's the sample book "School" that I created:

Page 1 - for use during morning meeting or circle time.  This board has a mix of SymbolStix and Widgit Symbols.
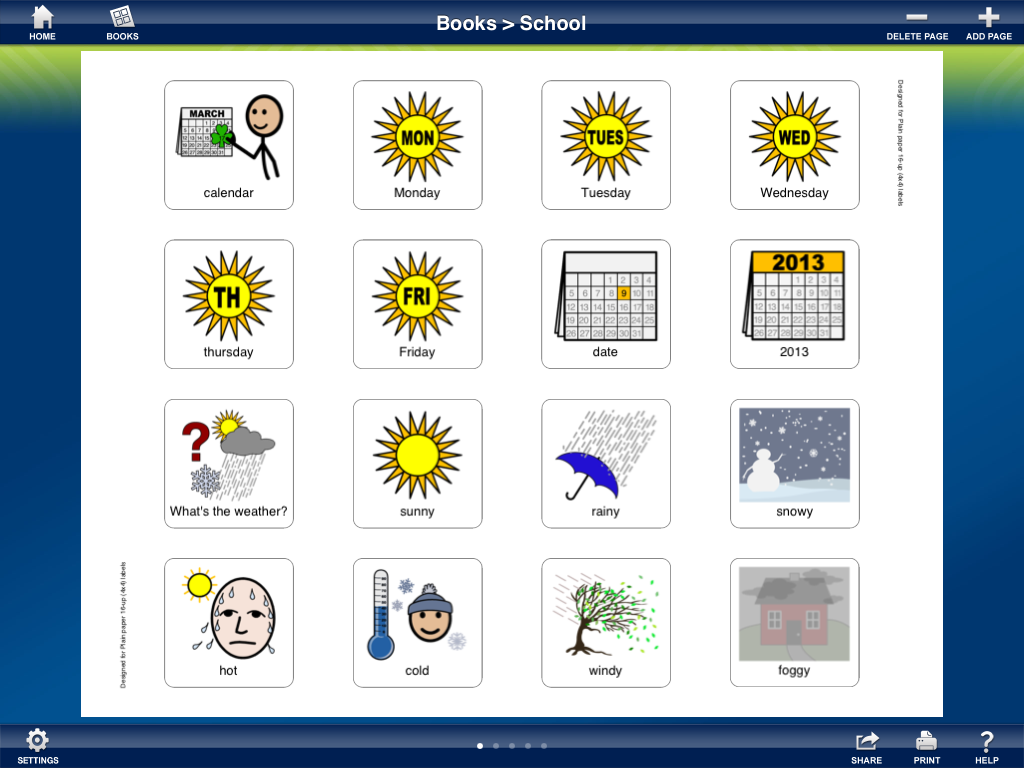

Page 2 - for use during breakfast.


Page 3 - for use during centers/free play.  This board has a combination of symbols and photographs.  I used photographs of classroom centers for students to select centers during free play time.


Page 4 - for use during lunch.  Again, this board has a combination of symbols and photographs.


Page 5 - for use during music class:


Page 6 - for socialization purposes, this page includes the children in the classroom so students can comment on attendance, etc.  You can easily use your iPad's camera to take pictures of each student in a class and create quick picture symbols!  Notice in this board I left some spaces blank.  If I choose to print like this, those spots will remain empty.


You can access each of your books by tapping the "books" icon in the top left corner or return home by tapping the house icon.


And that's the ProxTalker app!  Can you see how you do not need the ProxTalker device to use this app?  You can create picture symbols, picture supports, flash cards, therapy materials, etc. quickly and easily with this app!  Not to mention that you can use this app to create customized tags for your Logan ProxTalker device!  I like that you can group boards together into books and share the books via email.  With this option, you can create a set of boards for a student, access them yourself, and share with both parents and teachers!

The ProxTalker App (Professional) has multiple symbol libraries and the capability of using photographs.  This means that your options are endless when creating picture symbols, communication boards, and other visual supports!  In addition, it's more cost effective than a certain popular computer software designed for a similar purpose.

Head over to the app store and give the Lite Version a try!  Let me know what you think.  What types of materials/boards would you create with this app?


Disclaimer:  Although this app was provided to me by the developer, the opinions expressed in this review are mine alone.

Monday, July 1, 2013

Don't Throw it Away! Paint Sticks

Last year my family moved to a new house and we painted pretty much every room in it!  (Ok, so my husband and brother-in-law did the actual painting...).  Needless to say, after many, many trips to Home Depot, I ended up with a ton of extra paint sticks.  


Being the hoarder I am creative and thrifty, I saved them!  If you have extras, you should save them too!

First up, I used to work in a class where most of the kids had communication books.  Once the kids started to learn to put symbols together, we used the paint sticks rather than sentence strips.  We attached velcro to each side ("hook" Velcro on one side and "loop" on the other).  The child would create their sentence on the paint stick, take it off of their book (which also had Velro on the cover), and hand it to an adult.  The paint sticks are much sturdier than anything else we have tried for the purpose of combining picture symbols!


Next, I have a group of students who are, for lack of a better word, blurters!  They spend my entire session talking over each other!  To alleviate this, I created a "Talking Stick" using a paint stick and some colorful duct tape:


It's not very fancy, but it WORKED!  They started waiting for other children to finish speaking and asking for the stick so they could have a turn talking!


Similar to my talking stick, Maureen from The Speech Bubble created these cute "Sticky Sticks." These are similar to my Talking Stick, but you add a suction cup to one end and you can use them to pick up articulation cards!  Head over to her post to find out  more.


And finally (thank you Jenn from Crazy Speech World for reminding me of this one!)...Story Sticks!  For my version, I just attached Velcro to one side and created small images using either Boardmaker or LessonPix.  You can use these to sequence events in a story or for story retelling.  This is the one I use with "The Gingerbread Man":


Check out Jenn's much cuter version of a story stick HERE.


Do you have any other ways of using left over paint sticks?  I'd love to hear them!!


Friday, June 14, 2013

AAC Week: Review of Speech Journal by Mobile Education Store

Welcome to the last day in this short series on AAC.  I hope you've enjoyed it, picked up something useful, and/or learned something new!  Today I wanted to share the app Speech Journal by Mobile Education Store ($3.99 in iTunes).  Although this app wasn't specifically designed for AAC, it is definitely applicable to AAC.  


According to the Mobile Education Store's website, Speech Journal
"is designed to allow parents and speech pathologists the ability to create customized versions of any targeted speech-language activity. Uses for Speech Journal include: picture sequencing, multi-step picture schedules, multi-step directions, articulation, expressive language exercises, building narratives, individualized social stories, practice conversations. Speech Journal can also be used as a personal diary and as a way to create family vacation photo slideshows.Any image from your photo album can be imported into Speech Journal...Speech Journal can also function as a basic voice output augmentative communication device for children with limited verbal ability."
How it works:
When you begin, you will need to create a new student profile.  The Speech Journals you create for each student will be saved (if you choose to do so) under their profiles.


Once you have set up a student, this will be the screen you see when you open the app.  You can change the student here if you wish.


Notice the three options along the bottom?  You have "Info," which tells you about the app, "Record," which lets you create your Speech Journal (above), and "Archive," where you can access saved journals (more on that later).  In addition, in the blue bar along the bottom, there is a link to watch a video tutorial on how to use this app.

When you're ready, you can begin creating a Speech Journal by selecting "Choose Image" from the screen above. You will be able to choose where the pictures will come from:  Photos or Camera.  I chose photos:


You will need to allow Speech Journal access to your photos the first time you choose this option.  Then you can choose from any photo in your camera roll.  The pictures above are from an album I created from Google Images (see my post on that HERE) for a student working on initial /k/.

Once you select the image you wish to use, you can add audio by tapping the "record" button.


From the next screen, you can play back the recording and re-record if you don't like it.  Now, if you wish to add other "pages" to your Speech Journal, you will tap "Choose Image."


You can see that you can either "Add Image to this recording" (add a page to the Speech Journal) or "Choose Image for New Recording."  A word of warning...If you select "Choose Image for New Recording without first saving, you will lose everything you've added so far.


You can add audio to this image by tapping "Continue Recording."  Continue like this until you are ready to save your Speech Journal.  Tap "Save Recording" and name it.


Once saved, you can access your Speech Journals in the "Archive" section.  "Play All" will play the Journal like a slideshow, complete with audio.  You can add to your story by tapping "Continue Recording."  You can also delete any recordings that you do not wish to save any longer.


And lastly, you can email the Speech Journal to someone.  It will include all of the photos, as well as the audio recording.


You can very quickly create Story Journals to work on a variety of targets:
  • Articulation:  As I added pictures, I had a student record their productions.  We could play back and the student could judge accuracy of production.
  • Sequencing:  I have a few students with a goal of describing a procedure with 3-4 steps in sequence.  For this Journal, I added pictures showing the sequencing of washing your hands.  I then had students practice describing each step.  At the end, they could hear their completed description of the entire procedure.
  • Social stories:  You can take photos of the students during any particular activity and add the narration to complete a social story.
  • Narrative skills:  Add photos and have students work on creating a story with beginning/middle/end, age appropriate grammar/syntax, etc.
Speech Journal and AAC:
Really the possibilities are endless with this app!  Since it is AAC week, I'd like to take a few moments talking about how this app can help students who require alternative and augmentative means of communication.

Parent Communication:
Non-verbal students who require AAC often are unable to tell their parents about their day.  I once worked with a teacher who used to send home a list of questions and a Step-by-Step Communicator. The mother would ask the questions and the child would activate the switch to answer the questions.  I thought this was a great way to establish a home-school connection with this family!


That was pre-iPad.  Now you can easily use an app like Speech Journal to take pictures of the child throughout the day and give a narrative account for the parents.  It is fairly quick to create a recording in Speech Journal and it's much quicker to speak a narrative than to write out a note!

In addition, many students are now using iPads as their communication devices.  If this is the case and the iPad travels back and forth, the teacher can create Speech Journals about the child's day at school and the parent can create Journals to inform the teacher of the child's time at home.

If the iPad belongs to your district and not to the student, that's not a problem! Just email the Speech Journals to the parent and you can still establish the same lines of communication!

Voice Output Device:  You can use Speech Journal as a basic voice output device.  Insert a picture, record a message, and have the child hit "play" as they would hit a switch.  For example, if you are working on a farm theme and want to have the children say the sounds that animals make, you can create a Speech Journal with animal pictures and record their sounds.  Now the child who is non-verbal can participate with their peers.

So, as you can see, Speech Journal is a highly versatile app that is great for working on just about any objective, including AAC.  This app is quite reasonably priced in relation to other speech/language specific apps as well!  You can find Speech Journal in the App Store.


Tell me, what objectives would you target using Speech Journal?


Thursday, June 13, 2013

AAC Week: Logan ProxTalker


If you're anything like me, you may have heard of the Logan ProxTalker.  You may even have seen pictures of the device.  And, if you 're anything like me, you probably weren't sure exactly what the Logan ProxTalker was or what it did!  I was given the chance to try one out and I'm going to share my experiences with you today.


A Little Background:
The ProxTalker was developed by Glen Dobbs, a father and engineer.  Glen's son Logan was diagnosed with PDD-NOS at the age of two and a half.  When he was 4, Logan was introduced to PECS (Picture Exchange Communication System) by his Speech-Language Pathologist.  Logan became very good at using PECS to make his wants and needs known, but Glen still wanted him to have a "voice."  As he states, "the engineer in me took over" and the Logan ProxTalker Was developed!


So what is it?
The Logan ProxTalker is a mid-tech communication device that pairs PECS with voice output.  The PECS, or tags, are printed on or adhered to sturdy plastic cards that have radio frequency identification (RFID) chips embedded.  When the symbol is placed on any one of the buttons and pressed down, the message is "spoken."  The device has a built in microphone, adjustable volume control, and is run with 4 C batteries.

When I opened the box, this is what I saw (minus some packing material to prevent damage!):


Based on the information on the Logan ProxTalker website, this device is available in one of two formats.  First, you can purchase with a backpack.  The device snaps in to one side of the backpack, which has a zippered pouch in the front.  There's an extra strap if you choose to carry it over your shoulder:


Inside the back pack, the device is on one side, and there are Velcro pages for you to store/access your tags.


Not planning on transporting much?  The Logan ProxTalker also comes in a binder format.  The binder is actually mountable to a wheelchair or to a wall. The binder also comes with Velcro pages for tag storage:

Logan ProxTalker Binder closed (l) and open (r)
The device is the same with both purchasing options.  You can purchase the device with the binder and then purchase the backpack separately if you wish.  They are easy to switch with just a screwdriver or flat butter knife.  When you purchase this device you get:

  • 80 symbol tags
  • 20 blank tags (I'll go into these in a moment)
  • 4 Velcro pages
  • Maintenance tools 
  • Set of programming tags 

 *You can purchase more of any of the accessories listed above from the ProxTalker shop.

Using the Device:
Again, this device is really, really easy to use!  You grab a symbol, place it on any button and press!  The pre-printed symbol tags come with a message already recorded, but you can change the recording if you like (more on that in a bit as well!).  So, if you have a child working on Phase 1 PECS and they are requesting a puzzle, they would place the puzzle symbol on the device and press.  It doesn't take a major press to activate the button, so this device can be used with students with weakened muscles or low tone (I would consult with a child's PT/OT if you are considering this device, however, because it will require some control/accuracy to find a symbol, pick it up, and place it on a button).

requesting a puzzle

Further along in the Phases of PECS, you can use the ProxTalker to generate sentences of up to 5 symbols in length:


In the example above ("I want pink crayon"), the child would need to press each symbol to have the message spoken aloud.  Ugh!  I have kids that wouldn't be patient enough to do that.  Do you?  Well, good thing for us the ProxTalker comes with the little green circle button on the right in the picture below:


This is the "Speak All" tag.  When using this button, you line up your tags in the order you want.  Instead of pressing each one, you press the green circle and it will speak each tag in sequence from left to right!

Some more things you should know:
The ProxTalker comes with these programming tags.  When you press one of these on a button, you can modify the settings.  


The available actions on the programming tags include:  RECORD (this allows you to record a new message on a tag), ERASE (erase a preset message on a tag), INCREASE VOLUME (self explanatory!), DECREASE VOLUME (ditto), CHECK BATTERY (useful if you traveling, camping, on a field trip, etc.), DIAGNOSTICS (troubleshoot any problems you might be having).

In the true spirit of trialing a device, I had to replace the batteries.  They are really simple to access and replace!


ProxTalker in therapy:
I took this device to school and used it with a little boy who is (aside from a couple of words that are few and far between) non-verbal.  This boy picked up the concept of PECS in one therapy session, so I figured he would be a great student with whom to try out the ProxTalker!  He figured the device out pretty quickly as well!  We are still at the stage of using a single tag to make a request, but he's doing very well!  I also used this device with other students who are verbal.  See below for a description.

If you want to see the ProxTalker in action, check out this video:


Customizing the tags:
There are a few options for customizing the blank tags that come with the ProxTalker.  The blank tags come in both small and large sizes.  You may wish to use the larger ones for children with poor fine motor control.  


1.  The ProxTalker website has templates available for Communicate In Print, Boardmaker, and MS Word.

2.  There's an app for that!!  The ProxTalker App allows you to create communication boards using your own photos and preset symbols.  The boards you create can be organized into books and emailed to yourself, colleagues, and/or parents for printing.  You can use the boards on their own, or print on adhesive sheets and use with the blank ProxTalker tags!  (That means you don't need to have a ProxTalker to benefit from using this app!)  You can find the lite version HERE and the full version HERE.


3.  LessonPix also has a template for the ProxTalker device!  (If you don't already subscribe to LessonPix, you will want to head over there and check it out!  It's definitely worth the $36/year subscription fee!).  Simply add the icons you want to the tray and hit "Create Materials."  You can choose ProxTalker from the list of Materials Type and select the size of the tags you are using.


Since I was using a pirate theme in my therapy sessions this week, I created some tags so less verbal kids could participate in therapy sessions.  I printed the LessonPix symbols onto a sheet of labels that came with the ProxTalker:


Then I just peeled them off and stuck them to the blank tags:


Then I pressed the "record" tag and followed the instructions provided by the machine (press the tag you wish to record.  At the beep begin your recording, etc.).  Each tag allows for 8 seconds of recording time, so choose your message wisely!  This tag now says "Yo-Ho-Ho!" (check back next week for my book of the week and you'll see why I chose this message!).


4.  I noticed the shiny surface of the tags and thought, "I bet I could use a dry erase marker on here!"  I was right. :)  I wrote some sight words on the tags and worked on sentence forms/copula verbs with some of my kids:


My son was super excited about this activity and swapped out the food/color tags for about 20 minutes!


In Summary:
I really enjoyed trialing this device with my students (and my own child)!  It is a fantastic next step for kids who have learned and/or mastered the PECS system and want a "voice" as well.  I love the portability of the backpack.  I did find the binder to be a bit cumbersome, but I think you would want that format if you are planning on mounting the device.  With that said, I've trialed other devices before and found this one to be really, really user friendly!  ProxTalker is simple for SLPs, parents, and students to program and use...in fact, I only read the manual to figure out how to remove the ProxTalker from the backpack and how to change the batteries!  I also love that there are a variety of options for creating your own tags.  With all the options, you will definitely want to purchase more blank tags!  The possibilities are endless!

The price tag on a ProxTalker is up there (but not nearly as much as the popular high tech communication devices).  Chances are, an SLP won't be purchasing this item themselves, but may make a recommendation for a student.  If you'd like to try this device yourself, here's the link you will need.  If you have a student who would benefit from this device, the ProxTalker website has documents that you can download to request Medicaid funding.

Finally, I'd like to say "Thank you" to Glen for contacting me and letting me try out the ProxTalker, and a special shout out to Logan for inspiring his dad to create this amazing device!


Disclaimer:  Although the ProxTalker was provided for me to trial (yes, I have to return it!) for the purposes of this review, the opinions expressed are mine alone.
Related Posts Plugin for WordPress, Blogger...